 Save to Pinterest
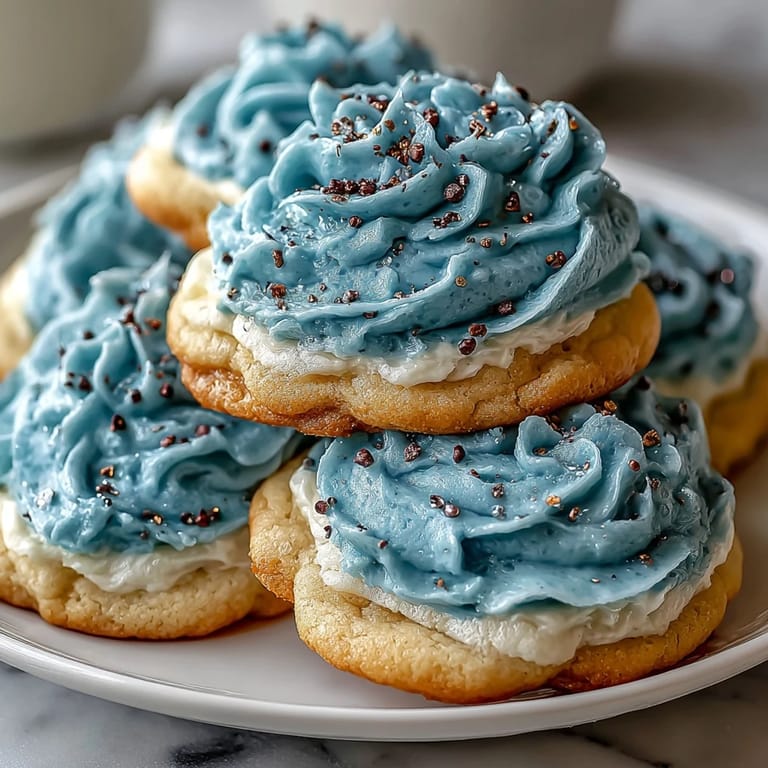
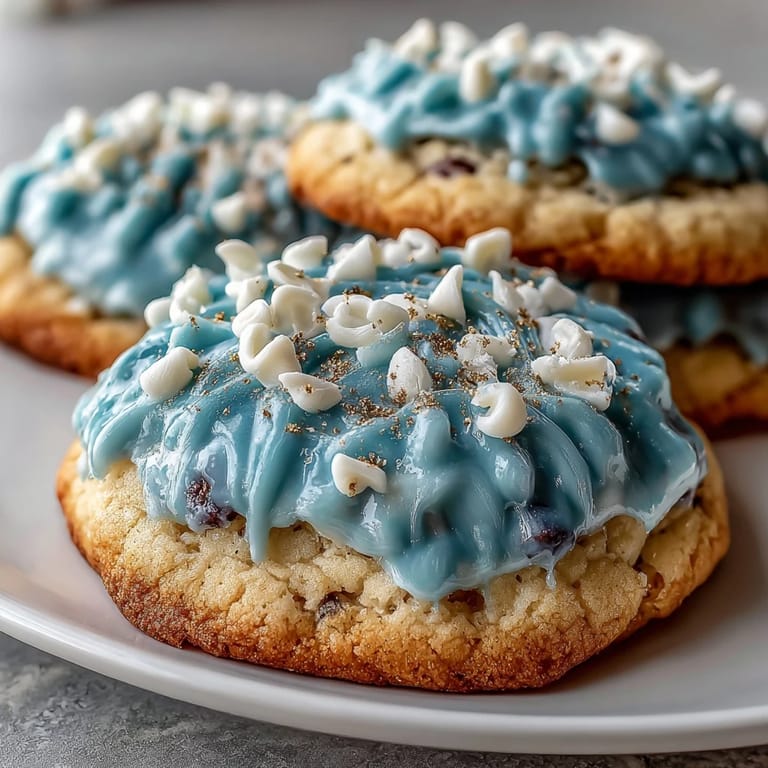
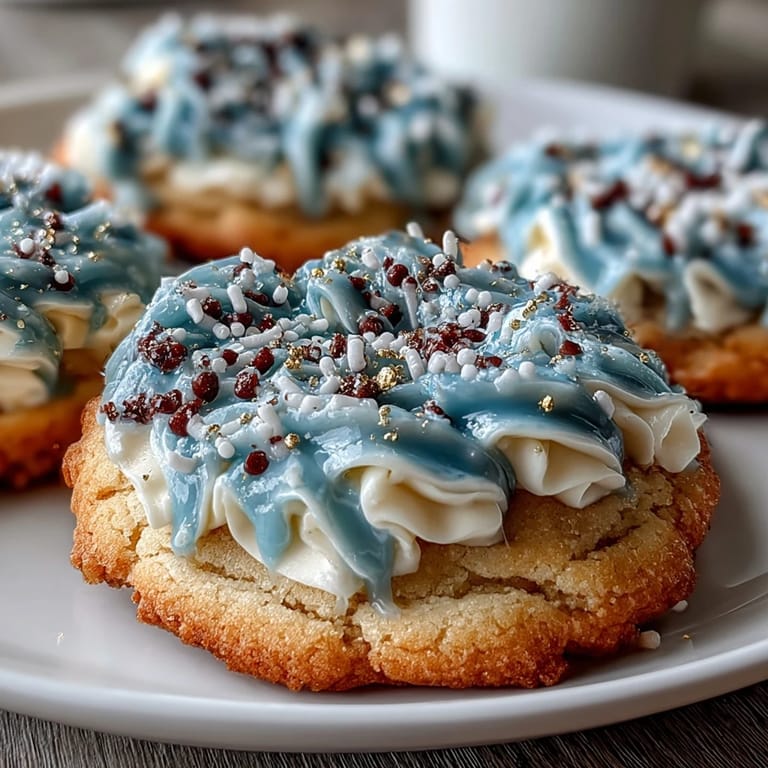
 My kitchen smelled like vanilla and possibility the afternoon I decided to recreate Pure Vanilla Cookie from Cookie Run Kingdom in edible form. There's something magical about turning a beloved character into something you can actually taste, and these cookies became my love letter to that elegant, pure-hearted cookie with the golden staff. The glossy royal icing transforms them from simple sugar cookies into something that feels almost too pretty to eat, which is exactly the point for a themed celebration.
I made a triple batch of these for a friends Cookie Run Kingdom viewing party, and watching people's faces light up when they realized each cookie was decorated individually felt worth every minute spent with a piping bag. One guest asked if I'd bought them from a specialty shop, which honestly might be the best compliment a homemade cookie can receive.
Ingredients
- All-purpose flour: The foundation that keeps cookies tender without being cake-like, and the modest amount of baking powder means they'll hold their shape beautifully.
- Unsalted butter: Cold butter beaten with sugar creates that signature light, fluffy crumb, so don't skip the softening step or you'll fight your mixer.
- Granulated sugar: This particular ratio gives you cookies that are sweet but not cloying, and crisp edges while staying soft inside.
- Pure vanilla extract: The non-negotiable ingredient that makes these taste like they should for Pure Vanilla Cookie, so resist the temptation to use imitation.
- Meringue powder: What transforms powdered sugar and water into that showstopping glossy icing that hardens beautifully without raw eggs.
- Gel food coloring: Liquid coloring will thin your icing and ruin the consistency, but gel stays concentrated and lets you create those perfect Pure Vanilla Cookie blues and golds.
Tired of Takeout? 🥡
Get 10 meals you can make faster than delivery arrives. Seriously.
One email. No spam. Unsubscribe anytime.
Instructions
- Mix the dry foundation:
- Whisk flour, baking powder, and salt together in a medium bowl and set it aside. This ensures your leavening is evenly distributed so every cookie rises consistently.
- Cream butter and sugar until clouds form:
- Beat softened butter with granulated sugar for 2 to 3 minutes until the mixture looks pale and fluffy, like you've captured something cloud-like in your bowl. This step aerates the dough and is non-negotiable for texture.
- Bring the wet ingredients together:
- Add the egg, vanilla extract, and milk to your butter mixture and blend until you don't see streaks anymore. The milk is the secret weapon that keeps these cookies tender rather than tough.
- Marry wet and dry gently:
- Add your flour mixture to the wet ingredients gradually, mixing just until the dough comes together without any visible flour streaks. Overmixing develops gluten and makes cookies dense, so stop as soon as you can't see dry flour.
- Chill the dough properly:
- Divide dough in half, flatten each into a disk, wrap tightly in plastic wrap, and refrigerate for at least one hour. Cold dough won't spread aggressively in the oven and will hold intricate shapes from your cutters.
- Preheat and prepare:
- Get your oven to 350°F and line baking sheets with parchment paper while dough chills. You want everything ready so cookies go straight from counter to oven without sitting around.
- Roll and cut with intention:
- On a lightly floured surface, roll one dough disk to exactly 1/4-inch thickness, then cut shapes cleanly with your cookie cutters. Flour your work surface lightly, not heavily, or you'll dry out the dough's edges.
- Space cookies for even baking:
- Transfer cookies to prepared sheets leaving one inch between each one, as they'll spread slightly during baking. Crowded cookies will bake unevenly and stick together.
- Bake until edges turn golden:
- Bake for 10 to 12 minutes until the edges are just beginning to turn golden but the centers still look slightly underbaked. They'll firm up as they cool and stay wonderfully soft inside.
- Cool strategically:
- Leave cookies on the baking sheet for 5 minutes to set slightly, then transfer to a wire rack to cool completely. This prevents them from breaking but allows air circulation so they don't steam and become soft.
- Create glossy royal icing:
- Combine sifted powdered sugar, meringue powder, vanilla extract, and 4 tablespoons of warm water in a large bowl, then beat on low speed until smooth and glossy. Add water one teaspoon at a time if needed until the icing reaches piping consistency without being runny.
- Tint and divide for creativity:
- Split your icing into separate bowls and add gel food coloring in small amounts, mixing thoroughly until you reach your desired shade. For Pure Vanilla Cookie theme, create soft blue, crisp white, and shimmering gold versions.
- Decorate with confidence:
- Transfer icing to piping bags or squeeze bottles and decorate fully cooled cookies with whatever designs capture the Pure Vanilla Cookie aesthetic for you. Let the icing set completely, at least 2 to 3 hours, before stacking or storing.
 Save to Pinterest
 These cookies transcended being just dessert when my little cousin carefully arranged them on a shelf to look like the Cookie Run Kingdom cast lineup, perfectly organized by color and size. Food that inspires that kind of creativity and joy becomes something worth the effort.
Getting the Texture Just Right
The magic happens in that precise balance between cookie softness and crisp edges. I learned this by over-baking an entire batch once and watching them turn into little crunchy disks that looked pretty but tasted like edible cardboard. Now I set a timer for 10 minutes, peek at the oven, and pull them out the moment the edges turn golden while the centers still look pale. That one-minute difference between perfect and ruined taught me to trust my eyes more than the recipe timing, since every oven behaves differently.
Decorating Without Piping Bag Stress
Professional-looking royal icing doesn't require professional piping skills, just the right consistency and patience. My breakthrough came when I realized that the icing thickness matters tremendously: too thick and you'll tear the cookies trying to pipe, too thin and designs blur together into muddy colors. I keep a small spoon nearby to adjust water content constantly as the icing sits and thickens from exposure to air, adding tiny splashes of water or a pinch more powdered sugar depending on what I'm seeing. Gel food coloring in small amounts means you can build up to your desired shade without accidentally making the icing too thin.
Storage and Gifting Success
Hard royal icing transforms these cookies into something stackable and giftable in ways soft-frosted cookies simply cannot be. I pack them in airtight containers with parchment paper between layers, and they stay fresh and crisp for up to one week at room temperature. The hard icing shell protects the cookie underneath while looking stunning when you open the container, which makes these perfect for gifting to friends, teachers, or at themed parties where presentation matters.
- Store cookies in airtight containers at room temperature for up to one week without any loss of quality.
- Layer cookies with parchment paper between them to prevent icing from sticking to other cookies or the container.
- These freeze beautifully both before and after decorating, so make them ahead without stress.
 Save to Pinterest
 These cookies prove that treating your kitchen creations like the celebration they truly are makes everything taste better. Serve them proudly.
Recipe FAQs
- → What gives these cookies their vanilla flavor?
Pure vanilla extract is added to both the dough and icing, infusing a rich, aromatic flavor throughout.
- → How is the royal icing prepared for decoration?
Powdered sugar, meringue powder, vanilla, and warm water are mixed together until smooth and glossy. Adding gel food coloring allows for vibrant decoration.
- → Why is chilling the dough important?
Chilling firms the dough, making it easier to roll and cut shapes while preventing spreading during baking.
- → What is the baking temperature and time?
Cookies bake at 350°F (175°C) for 10–12 minutes until edges start to turn golden.
- → How should decorated cookies be stored?
Store in an airtight container at room temperature for up to one week, ensuring the royal icing has fully set before storage.